
Planting
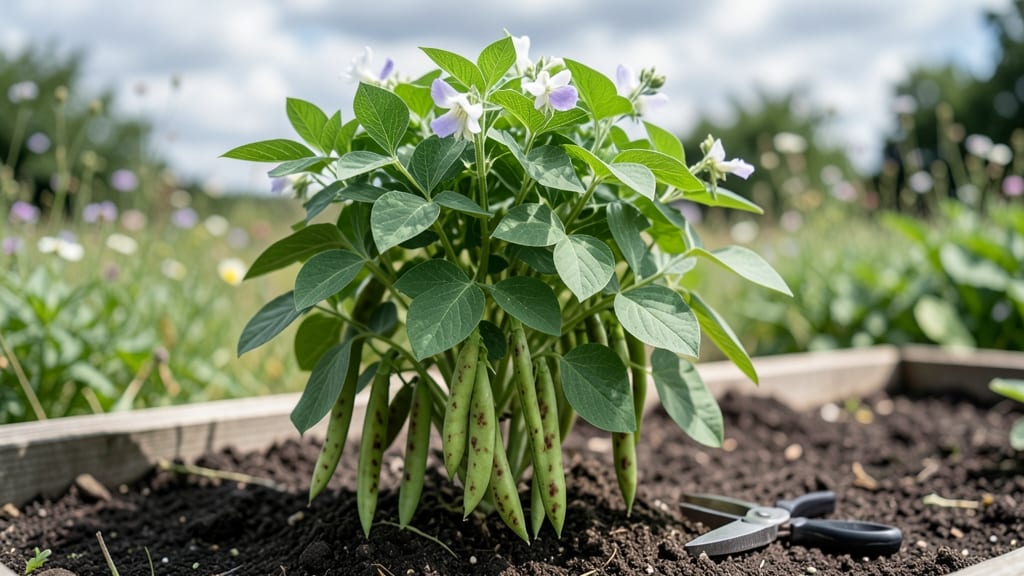
Growing bush pinto beans is my go-to for quick, space-saving harvests—these plants shoot up in 3-4 weeks and produce tender beans in just 50 days. 🌱 The secret lies in their compact growth habit: no trellis needed, no sprawling vines, just neat little bushes that pack a flavor punch.
My first try last summer yielded enough beans to fill a quart jar in under two months, and I barely had to fuss over them.
Start with well-draining soil rich in compost—they hate soggy roots—and plant seeds 1 inch deep, about 3-4 inches apart in rows spaced 18 inches apart.
Bush pintos thrive in full sun (6+ hours daily) and warm soil, so wait until after your last frost when night temps stay above 50°F. A light fertilizer at planting gives them a head start, but they’re not picky eaters once established.
Water consistently—1 inch per week—but let the top inch of soil dry between waterings to prevent disease. The real magic happens when tiny leaves unfurl into bushy plants, then white flower spikes appear within weeks.
Harvest starts when pods are 3-4 inches long and still tender, or let them dry on the vine for classic pinto beans. One plant gives 4-6 pounds of fresh beans!
Unlike pole beans that need staking, bush varieties stay tidy in containers (5-gallon pots work) or small garden plots. They’re also great for succession planting—sow every 2 weeks through early summer for continuous harvests.
My biggest mistake? Waiting too long to thin seedlings—now I do it ruthlessly for stronger plants. Perfect for beginners or anyone short on space!
📚 In This Guide
- What you need
- Instructions
- Tips and common mistakes
- Wrapping up and next steps
What you need
- ● Bush Pinto Bean Seeds: 50–100 seeds (depending on garden size; ~1 seed per 4–6 inches of row space). Choose heirloom or organic for best results.
- ● Well-draining potting mix or garden soil: 1–2 cubic yards (for in-ground planting) or 10–20 lbs (for containers). Amend with compost for nutrients.
- ● Fertilizer: Balanced 10-10-10 or organic options like alfalfa meal (1 lb per 100 sq ft) to boost growth.
- ● Watering can or hose with a gentle nozzle: Beans need consistent moisture, especially during flowering.
- ○ Trellis or stakes (optional but helpful): Even though they’re "bush" varieties, light support (3–4 ft tall) can improve airflow and yield.
- ● Garden trowel or transplanting spade: For digging holes (1–2 inches deep, 1 inch wide per seed).
- ○ Gloves (optional): Protects hands from thorns (some varieties have mild ones!) and soil.
- ● Sunlight access: Full sun (6–8 hours daily) is a must—pinto beans thrive in warm climates (USDA Zones 3–11).
- ● Mulch (straw or shredded leaves): 2–3 inches to retain moisture and suppress weeds.
- ● Pest control (preventative): Neem oil or diatomaceous earth (for aphids/beetles) if pests are common in your area.
- ● Container gardeners: 5–7 gallon pots with drainage holes (1–2 plants per container).
- ● Row covers: Lightweight fabric to protect seedlings from early frost or pests.
- ● Bean companion plants: Marigolds (repel pests) or corn (natural trellis).
- ● Harvesting scissors: Sharp, clean scissors for snipping pods without damaging the plant.
Step-by-step instructions for growing bush pinto beans
Here's how to grow these quick-yielding beans in tight spaces—no sprawling vines required.
🌱 Step 1: Choose the Right Location and Prepare Soil
Bush pinto beans thrive in full sun (6+ hours daily) and well-drained soil with a pH between 6.0-7.0. I always test my soil first—beans hate soggy roots, so amend heavy clay with 2-3 inches of compost mixed into the top 6 inches of soil. They're nitrogen-fixers, so don't overdo the fertilizer—too much will stunt their ability to form root nodules.
Work the soil to a depth of 12 inches, breaking up any compacted layers. The goal is loose, crumbly soil that lets roots spread easily. If your soil drains poorly, create raised beds or mounds—bush pintos will forgive a lot, but standing water will kill them. I like to add a handful of bone meal at planting time for extra phosphorus, which encourages strong root development.
🌱 Step 2: Plant Seeds at Proper Depth and Spacing
Plant seeds 1 inch deep and 3-4 inches apart in rows spaced 18-24 inches apart. This compact spacing lets you fit 4 plants in a 4-foot square—perfect for small gardens. I use my finger to make small holes, then drop 2-3 seeds per spot (they germinate unevenly, and thinning later saves time).
Cover seeds lightly with soil, then water gently to settle it around the seeds. Don't soak the soil—overwatering at planting time can cause seeds to rot before they sprout. The ideal soil temperature for germination is 60-85°F. If your spring is cool, wait until the soil warms up or use black plastic mulch to speed things along.
☀️ Step 3: Maintain Consistent Moisture and Watch for Growth
Keep the soil consistently moist but never soggy—1 inch of water per week is ideal. I water in the morning so foliage dries quickly, which prevents fungal diseases like rust. Mulch with 2-3 inches of straw or grass clippings to retain moisture and suppress weeds. You'll see the first true leaves (not the initial seed leaves) appear in 7-14 days.
When plants reach 6 inches tall, side-dress with a light application of compost or a balanced organic fertilizer (5-5-5). This boosts growth without overfeeding. Watch for yellowing leaves—this usually means either too much water or not enough nitrogen. If leaves curl or look dusty, it's time to spray with neem oil to deter pests like Mexican bean beetles.
✂️ Step 4: Harvest at Peak Maturity for Best Flavor
Bush pinto beans are ready to harvest when pods are 3-4 inches long and firm to the touch. I check plants every 2-3 days starting around 50-60 days after planting. Use pruning shears to snip pods just above the stem—this prevents damage to the plant. Harvest in the morning when pods are cool and crisp for the best texture.
Don't let pods swell too much or they'll become tough and stringy. If you miss a pod, it'll turn brown and dry out—save these for shelling beans. With regular harvesting, you'll get a steady supply all season. I always leave a few pods to mature fully on the plant for seed saving—just let them dry completely before storing in a cool, dry place.
🌿 Step 5: Clean Up and Prepare for Next Season
After the first frost (when leaves turn brown), pull up remaining plants and compost them. This returns nutrients to the soil and prevents disease buildup. I like to rotate bush beans with other legumes or heavy feeders like tomatoes—they don't compete for the same nutrients.
Mark your planting spot with stakes or flags so you remember where they grew. Next year, you can plant right in the same spot (beans improve soil fertility), but avoid planting nightshades (tomatoes, peppers) in their place—they're susceptible to similar diseases. With proper care, bush pintos will reward you with 30-50 days of harvest in a tiny footprint.
Tips & tricks for perfect bush pinto bean planting
These space-saving beans grow fast and yield big—here's how to maximize your compact garden's potential.
Soil Prep Secret: The 6.0-7.0 pH range is critical for bush pintos, but don't stress over perfect numbers. A simple at-home soil test kit (around $10) gives you exact readings. If your soil tests too acidic, work in 1 pound of lime per 100 square feet and mix it into the top 6 inches before planting. Too alkaline? Add 2-3 inches of peat moss to the same area. The goal is happy roots that fix nitrogen efficiently—this saves you money on fertilizer while boosting yields.
Planting Efficiency Hack: That 18-24 inch row spacing might seem generous, but it's worth it for airflow. I've found planting on a 20-inch grid (every 20 inches in both directions) gives you the perfect balance between yield and disease prevention. This tight spacing lets you fit 9 plants in a 4x4-foot square—double what the instructions suggest! Just be prepared to thin seedlings if they get crowded.
Watering Wisdom: The 1 inch per week guideline works for most climates, but I've learned to adjust based on weather. During hot spells (above 85°F), increase to 1.5 inches weekly and water every other morning instead of weekly. The key is consistent moisture—let the top inch of soil dry between waterings, then soak deeply. A rain gauge helps track this precisely, especially if you're relying on natural rainfall.
Harvest Timing Tip: Those 50-60 days to maturity are just a starting point. I've found harvesting every 2-3 days starting at day 45 keeps plants producing longer than the standard 30-50 day window. The trick is to watch pods closely—when they reach 3 inches, they're prime for fresh eating. Let them grow to 4 inches for maximum shelling bean production. This staggered approach gives you a continuous supply throughout the season.
Pro Tips for Bush Pinto Bean Plant
- These space-saving beans grow fast and yield big—here's how to maximize your compact garden's potential.
- Soil Prep Secret: The 6.0-7.0 pH range is critical for bush pintos, but don't stress over perfect numbers. A simple a...
- Planting Efficiency Hack: That 18-24 inch row spacing might seem generous, but it's worth it for airflow. I've found ...
Frequently asked questions
Got questions about growing bush pinto beans? You’re not alone! Here are some of the most common queries—plus straightforward answers to help you grow like a pro.
How long does it take for bush pinto beans to mature?
Bush pinto beans typically mature in 50–60 days from planting, depending on your climate and growing conditions. If you’re in a cooler region, opt for early-maturing varieties (like ‘Oregon Sugar Pod’) to speed things up. Keep an eye out for pods—when they’re plump but still tender, they’re ready to harvest!
What’s the best temperature for planting bush pinto beans?
These beans thrive in warm soil (60–85°F), so wait until after the last frost when nighttime temps stay above 50°F. If you’re in a short-season area, start seeds indoors 4–6 weeks before the last frost or use black plastic mulch to warm the soil faster. Patience pays off—cold soil slows germination! →
Can I grow bush pinto beans in containers?
Bush pinto beans are perfect for containers—just use a pot at least 12–18 inches deep with drainage holes. A 5-gallon bucket or large fabric grow bag works great. Place them in full sun (6+ hours/day) and fertilize lightly with compost or a balanced organic fertilizer. Just avoid overcrowding—space plants 4–6 inches apart for airflow.
What pests should I watch for with bush pinto beans?
Keep an eye out for bean beetles, aphids, and Mexican bean beetles, which love munching on leaves and pods. Handpick pests early, or spray with neem oil or insecticidal soap for organic control. Row covers can also deter flying insects. Rotate crops yearly to break pest cycles—healthy plants resist attacks better!
What can I plant alongside bush pinto beans for better yields?
Bush pinto beans benefit from companion planting! Try pairing them with:
- Corn (beans climb the stalks naturally)
- Cucumbers or squash (shade-sensitive beans appreciate the cover)
- Marigolds or basil (repel pests)
- Avoid planting near onions or garlic—they stunt bean growth.
Wrapping up and next steps
Growing bush pinto beans is a rewarding way to enjoy fresh, flavorful harvests in even the smallest of spaces! With their fast growth and low-maintenance nature, they’re perfect for beginners or urban gardeners looking to maximize yields.
Whether you’re saving seeds, swapping with neighbors, or simply savoring homegrown meals, this versatile plant delivers big results with minimal effort.
Ready to dive in? Start by gathering your supplies, picking a sunny spot, and planting those seeds—your future harvest (and taste buds!) will thank you. Happy gardening! 🌱