
Container Gardens
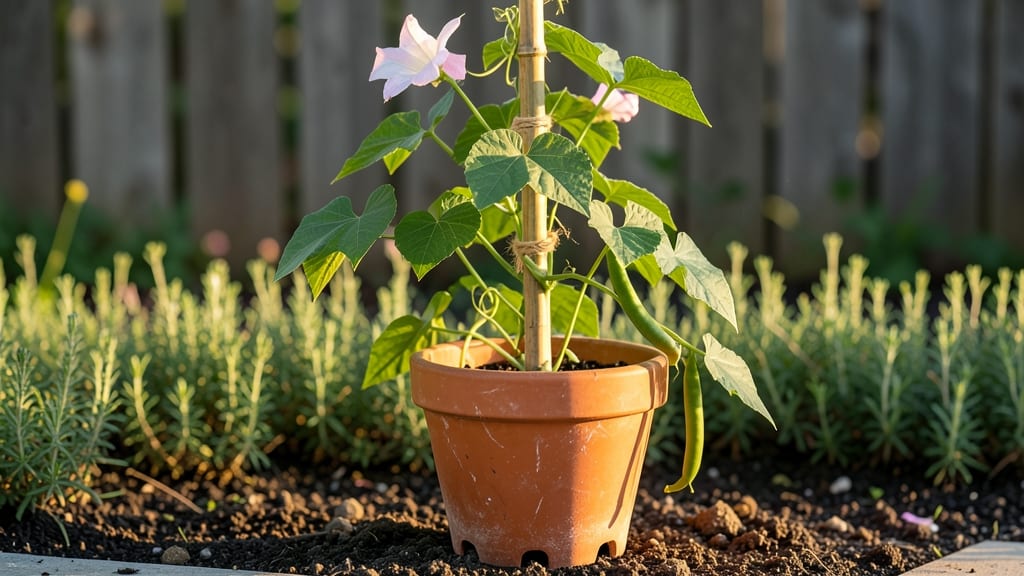
Growing pole beans in pots can yield 20 pounds of fresh beans—last summer, mine thrived in just a 5-gallon container on my tiny balcony. 🌱 The secret isn’t fancy equipment but matching the right pot, soil, and support to how these vining plants naturally grow upward instead of sprawling outward.
You’ll need a 5-gallon minimum container (bigger for heavier harvests), well-draining potting mix, and a sturdy trellis or cage. Pole beans thrive in full sun (6+ hours daily) and need consistent moisture—think damp sponge, not soggy.
The vertical setup saves space while maximizing production, perfect for urban balconies or small patios.
By midseason, you’ll watch those tendrils climb and pods form along the stems. Regular harvesting keeps plants productive, and a balanced fertilizer (like 10-10-10) every 3-4 weeks prevents nutrient burnout. The beans taste sweeter when picked young, and the plants keep producing until frost.
Common issues? Root binding happens in small pots—upgrade containers as plants grow. Watch for Mexican bean beetles (handpick eggs) and spider mites (spray with neem oil). With these adjustments, you’ll get a foolproof vertical harvest that outperforms traditional row gardens.
📚 In This Guide
- What you need
- Instructions
- Tips and common mistakes
- Wrapping up and next steps
What you need
- ● Pole bean seeds: 3–5 seeds per pot (fast-growing varieties like ‘Kentucky Wonder’ or ‘Rattlesnake’ work great).
- ● Containers: At least 12–18 inches deep (5-gallon buckets, fabric grow bags, or large pots with drainage holes). Use 2–3 pots per plant for climbing support.
- ● Potting mix: Well-draining, organic-rich soil (avoid garden soil—it compacts!). A 50/50 mix of potting soil and compost is ideal.
- ● Trellis or support: A 5–6 foot tall trellis, bamboo stakes, or a sturdy wire cage (attach to the pot or nearby structure).
- ● Drainage: Pebbles or broken pottery at the bottom of pots (1–2 inches) to prevent root rot.
- ● Watering can or hose: With a gentle spray nozzle for consistent moisture.
- ● Fertilizer: Balanced organic fertilizer (10-10-10 or compost tea) or a slow-release granular fertilizer.
- ● Mulch: Straw or shredded leaves to retain moisture and suppress weeds.
- ● Plant ties: Soft cloth or plastic strips to secure vines to trellises as they grow.
- ● Shade cloth: If growing in hot climates, use 30–50% shade fabric to protect young plants.
- ● Compost tea or fish emulsion: For a nutrient boost during flowering.
- ● Pest control: Neem oil or insecticidal soap (preventative measure for aphids or beetles).
Step-by-Step guide to growing pole beans vertically in containers
Here's how to transform limited space into a productive pole bean garden with minimal fuss.
🪴 Step 1: Select the Right Containers and Position
Choose containers that are at least 12-18 inches deep and have drainage holes—pole beans need room for roots to anchor while climbing. I use 5-gallon buckets with drainage holes drilled in the bottom because they're sturdy and provide enough volume for a single plant. Place containers where they'll receive 6-8 hours of direct sunlight daily, ideally near a south-facing wall or fence.
If you only have partial sun, opt for shorter varieties like 'Blue Lake Bush' or 'Kentucky Wonder'—they'll still climb but tolerate slightly less light. The key is consistent moisture and warmth; pole beans wilt dramatically when thirsty. Position containers where they won't be disturbed by foot traffic or pets, as the plants will grow 6-10 feet tall in a single season.
🌱 Step 2: Prepare Soil and Plant Seeds
Fill your container with a mix of 60% potting soil and 40% compost—this gives beans the nitrogen they crave while keeping the soil loose enough for roots to spread. I always add a handful of aged manure or worm castings to the bottom layer for extra fertility. Moisten the mix until it's damp like a wrung-out sponge, but not soggy.
Plant 2-3 seeds per container, burying them 1 inch deep in a small trench. Space seeds 2 inches apart to prevent overcrowding. Once all seeds are planted, cover lightly with soil and pat down gently. Water thoroughly until moisture reaches the bottom of the container. Germination typically occurs in 7-14 days at soil temperatures above 60°F.
☀️ Step 3: Install Support and Train Vines
As soon as seedlings reach 4-6 inches tall, install a 5-6 foot tall trellis or sturdy bamboo stake in the center of the container. I use a simple A-frame trellis made from wooden dowels and twine—it's lightweight, affordable, and lasts multiple seasons. Gently weave the main stems through the trellis as they grow, securing them with soft plant ties or old fabric strips.
Pole beans need support early to avoid flopping and to encourage upward growth. If you miss this window, the plants will sprawl and produce fewer pods. Here's the thing—don't rush to tie vines. Wait until they're 3-4 inches tall and have at least two true leaves before guiding them onto the trellis. This prevents stem damage and encourages stronger growth.
💧 Step 4: Water and Fertilize Consistently
Water your pole beans deeply every 2-3 days until the top 2 inches of soil feel dry. Containers dry out faster than garden beds, so check moisture daily during hot weather. I use a moisture meter to avoid overwatering—beans hate soggy roots. Water at the base in the morning to allow leaves to dry before evening, which prevents fungal diseases like rust.
Feed plants every 3-4 weeks with a balanced liquid fertilizer (10-10-10) diluted to half strength. I also sprinkle a handful of compost around the base monthly to replenish nutrients. Watch for yellowing leaves—this usually means the plant needs nitrogen. A quick side-dressing of compost or a diluted fish emulsion fix the problem fast.
✂️ Step 5: Harvest and Maintain Through the Season
Begin harvesting when pods reach 4-6 inches long and feel firm to the touch. Pick regularly to encourage more production—beans left on the vine turn woody and tough. I harvest every 2-3 days during peak season, which keeps plants productive for 6-8 weeks in most climates. Use sharp scissors or pruners to cut pods cleanly without damaging the vine.
Remove any yellowed or diseased leaves immediately to improve airflow. If vines grow too long, trim back the tips to redirect energy to pod production. Here's what I do at the end of the season: I cut the plants down to 6 inches tall**, compost the debris, and refresh the soil with new compost. This keeps containers fertile for next year's planting.
Tips & tricks for perfect pole bean growth in containers
Here's what I learned after years of growing pole beans in tight spaces—and how to avoid my early mistakes.
Container Depth Matters: Those 12-18 inches of depth in Step 1 aren't just a suggestion—they're crucial. I once tried 10-inch pots and ended up with stunted plants that struggled to support their own weight. If you're using decorative containers, check the depth first. For extra insurance, add a 2-inch layer of gravel at the bottom before your soil mix to improve drainage and root development. This prevents the dreaded "drowning roots" scenario that kills pole beans.
Soil Temperature is Non-Negotiable: The 60°F minimum in Step 2 isn't just a guideline—it's a hard limit for germination. If your soil feels cooler than that, wrap containers with bubble wrap or move them to a sunny windowsill for a few days before planting. I've seen seeds take 3 weeks to sprout when soil was only 55°F! Pro tip: Use a soil thermometer for 3 days before planting to confirm you're in the sweet spot. Warm soil = faster, more reliable germination.
Support Timing is Critical: Waiting until seedlings reach 4-6 inches in Step 3 seems simple, but timing matters more than you'd think. I learned this the hard way when I installed trellises too early—young stems snap under their own weight when they're not strong enough. The 3-4 inch mark with two true leaves is perfect because stems have developed enough vascular structure to support climbing. Use soft plant ties (not wire) to secure vines, and always leave room for growth—beans will double in height within weeks.
Harvest Frequency Determines Productivity: That 2-3 day harvest window in Step 5 isn't just about getting fresh beans—it's about telling your plant to keep producing. When I first grew pole beans, I'd harvest every 5-7 days, and production slowed dramatically after just 3 weeks. The key is consistency: pick when pods are 4-6 inches long, and your plants will reward you with continuous harvests for the full 6-8 week season. Think of it like training a dog—reward the behavior you want to see!
Pro Tips for Growing Pole Beans In Pots
- Here's what I learned after years of growing pole beans in tight spaces—and how to avoid my early mistakes.
- Container Depth Matters: Those 12-18 inches of depth in Step 1 aren't just a suggestion—they're crucial.
- Soil Temperature is Non-Negotiable: The 60°F minimum in Step 2 isn't just a guideline—it's a hard limit for germination.
Frequently asked questions
Got questions about growing pole beans in pots? You’re not alone—here are some of the most common ones to help you grow confidently, even in small spaces!
What’s the best pot size for pole beans?
Pole beans need at least 10–12 inches in diameter and depth per plant (or 5-gallon+ pots) to support their roots and vines. For multiple plants, opt for a large container (18"+ wide) or stack pots vertically. Drainage holes are a must to prevent root rot!
How long does it take for pole beans to grow in pots?
From seed to harvest, expect 60–80 days in warm weather (70°F+). With proper care, you’ll see first flowers in 3–4 weeks and pods ready to pick in 1–2 weeks after that. Cool temps? Extend the timeline—beans love heat!
Can I grow pole beans in pots without a trellis?
Technically yes, but they’ll sprawl everywhere and produce fewer pods. If skipping a trellis, use a sturdy cage (like tomato cages) or let vines climb a nearby fence. For compact pots, a small A-frame trellis (DIY with bamboo stakes!) works best.
What should I do if my pole beans get pests in pots?
Common culprits: aphids, spider mites, or Mexican bean beetles. Start with neem oil spray or insecticidal soap for mild infestations. For beetles, handpick eggs (tiny yellow clusters under leaves). Encourage ladybugs by planting marigolds nearby!
Do pole beans need full sun in pots?
6–8 hours of direct sunlight daily
is ideal. Pots heat up faster than ground soil, so place them in morning sun + afternoon shade in hot climates. If sunlight is limited, choose fast-maturing varieties like ‘Kentucky Wonder’ or ‘Blue Lake.’
Can I reuse soil from last year’s pole beans in pots?
Not recommended! Pole beans are legumes and can deplete soil nutrients or harbor diseases. Refresh your potting mix with 50% new compost and 10% perlite to improve drainage. Rotate crops yearly if reusing containers.
Wrapping up and next steps
Growing pole beans in pots is a fantastic way to maximize your small space while enjoying a bountiful, homegrown harvest! With the right setup—whether you’re using a simple 5-gallon container or a trellis system—you’ll be rewarded with nutrient-rich, flavorful beans that thrive vertically.
Plus, it’s beginner-friendly, eco-conscious, and perfect for balconies, patios, or even sunny windowsills.
Ready to dive in? Start by choosing your favorite variety (like Kentucky Wonder or Scarlet Runner) and gather your supplies. Then, follow the steps above to create your own compact, high-yielding bean garden.
Before you know it, you’ll be savoring fresh, homegrown beans straight from your pots—no yard required! 🌱🍲