
Vegetables
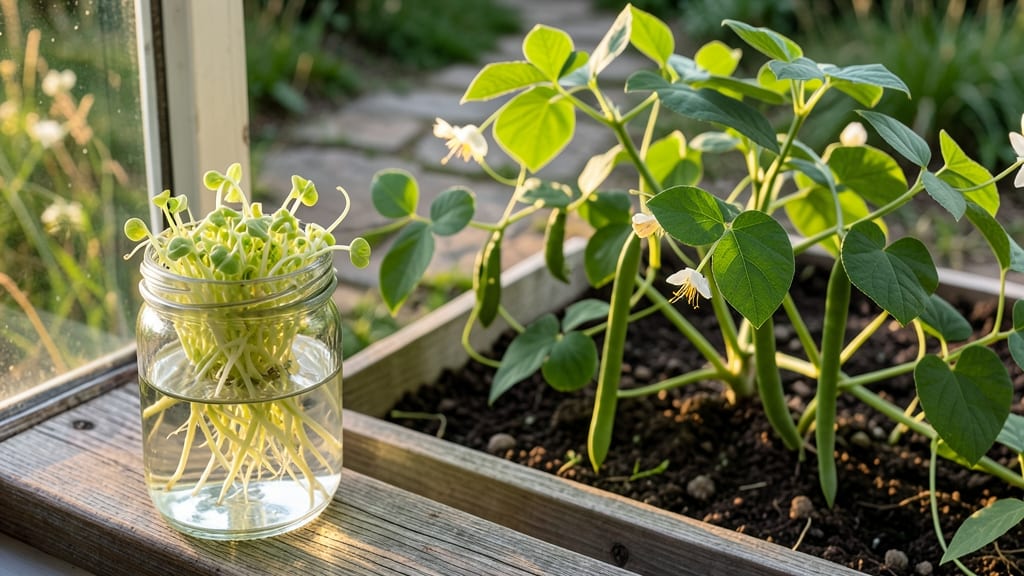
Growing green beans and bean sprouts lets you harvest fresh, crisp pods from a tiny footprint. 🌱 I've packed both bush beans and sprouts into my balcony garden, and the secret is vertical space—whether you're growing 6-foot poles or 3-inch sprouts in a jar.
The same bean family delivers two completely different growing experiences, both shockingly productive in small spaces.
Green beans thrive outdoors in warm soil, while bean sprouts sprout indoors in just a jar and paper towels. For beans, you'll need 5-6 hours of sun, well-draining soil, and either a trellis or sturdy stakes.
Sprouts? Just a quart jar, some beans, and a dark cabinet. Both methods avoid the mess of traditional gardening while delivering harvests in under 60 days.
You'll end up with tender beans fresh from the vine and crisp, nutrient-packed sprouts for salads—all without taking over your yard. The vertical approach maximizes space, and both plants are disease-resistant when grown correctly.
My first harvest had me snapping beans straight from the plant and tossing sprouts into sandwiches within days.
Works for city balconies, sunrooms, or even kitchen counters. The only difference between failure and success is knowing when to plant, how to water, and what pests to watch for. Let's get those beans growing!
📚 In This Guide
- What you need
- Instructions
- Tips and common mistakes
- Wrapping up and next steps
What you need
- ● Green bean seeds: 1–2 lbs (choose bush or pole varieties like 'Blue Lake' or 'Contender' for vertical growth).
- ● Growing containers: 5-gallon buckets (2–4) with drainage holes, or
- ● Vertical trellis system (e.g., A-frame or wall-mounted trellis, 6–8 ft tall).
- ● Potting mix: 10–15 lbs of well-draining, organic soil blend (e.g., 60% compost, 30% coco coir, 10% perlite).
- ● Fertilizer: Balanced organic fertilizer (10-10-10) or compost tea for nutrient boost.
- ● Watering can or hose with gentle spray nozzle.
- ○ Twine or plant ties (optional): For securing vines to trellises.
- ○ Pruning shears (optional): For trimming excess growth.
- ● Mung bean or adzuki bean seeds: 1–2 cups (organic, non-GMO preferred).
- ● Sprouting jar or container: Wide-mouth mason jar (quart size) with a sprouting lid, or
- ● Colander + fine mesh screen + rubber band (DIY setup).
- ○ Sprouting tray (optional): For rinsing and draining (e.g., bamboo steamer tray).
- ○ Cheesecloth or mesh strainer (optional): For rinsing seeds.
- ○ Spray bottle (optional):** For misting seeds during germination.
- ● Sunlight: 6–8 hours of direct sunlight daily (south-facing window or grow lights for indoor setups).
- ● Temperature: Ideal range of 70–80°F (21–27°C) for germination; green beans tolerate cooler temps (down to 50°F/10°C).
- ● Space: Vertical setup requires ~2–3 ft of wall space or a corner; sprouts need minimal countertop space.
- ● Time commitment: Green beans: 50–60 days to harvest; sprouts: 3–7 days!
Step-by-Step guide to growing green beans and bean sprouts vertically
Tired of sprawling vines taking over your garden? Here’s how to grow both green beans and bean sprouts in a compact, space-saving way.
🌱 Step 1: Choose the Right Varieties for Vertical Growth
For green beans, select bush or pole varieties—pole beans like ‘Kentucky Wonder’ or ‘Blue Lake’ climb naturally, while bush beans like ‘Contender’ can be trained with support. Bean sprouts, on the other hand, don’t need climbing space; focus on fast-maturing varieties like mung or adzuki beans for quick harvests.
Start with 4 plants (as promised) to balance both green beans and sprouts. If growing sprouts indoors, use small containers or trays—they’ll be ready in just 3-5 days, while green beans take 50-60 days to mature. Label each plant or container to avoid confusion as they grow.
🪴 Step 2: Set Up Vertical Support Systems
For green beans, install 5-6 foot tall trellises, stakes, or cages—I like using bamboo stakes or sturdy wire mesh because they’re easy to assemble and won’t rot quickly. Secure the support in the ground or against a fence, ensuring it’s stable enough to hold 4-5 pound vines by harvest time.
If space is tight, use wall-mounted pockets or hanging planters for bush beans. For sprouts, no support is needed—just a shallow tray or jar with a mesh lid for drainage. Place everything in a spot with at least 6-8 hours of sunlight daily—green beans thrive in full sun, while sprouts need bright, indirect light.
💧 Step 3: Plant and Water for Optimal Growth
Sow green bean seeds 1 inch deep and 3-4 inches apart at the base of your trellis. Water deeply right after planting to settle the soil, then keep the soil evenly moist but not soggy—green beans hate waterlogged roots. For sprouts, soak ¼ cup of beans overnight, then drain and spread them on a moist paper towel or mesh screen in a shallow tray.
Watch for first true leaves on green beans in 7-10 days—that’s your cue to start training vines upward. Gently tie the main stem to the trellis with soft twine or plant clips. For sprouts, rinse twice daily with cool water to prevent mold. You’ll see 1-inch sprouts in just 2 days—harvest them at this stage for crisp, tender bites.
☀️ Step 4: Maintain and Harvest for Continuous Yields
Green beans need consistent watering, especially during flowering and pod development. Water at the base of the plant in the morning to reduce disease risk. Fertilize lightly with a balanced 10-10-10 formula when flowers appear, but avoid overfeeding—too much nitrogen leads to leafy growth instead of beans.
Harvest green beans every 2-3 days once pods reach 4-6 inches long—they turn woody and tough if left on the vine. For sprouts, harvest within 3-5 days of germination for peak freshness. Rinse and store them in the fridge for up to 5 days, or use them immediately in salads, stir-fries, or sandwiches.
✂️ Step 5: Extend the Season with Succession Planting
To keep a steady supply, plant new green bean seeds every 2 weeks after the first harvest. In cooler climates, use row covers or cold frames to extend the season into fall. For sprouts, you can re-sprout the same seeds—just rinse and drain them again after the first harvest for a second batch within days.
Here’s the thing—green beans and sprouts play well together. While your beans climb vertically, sprouts grow in minutes on your counter. It’s a two-in-one system that maximizes space and minimizes effort. Plus, you’ll always have fresh beans on hand, whether as crisp sprouts or tender pods straight from the vine.
Tips & tricks for perfect vertical green bean and sprout harvests
Here's what nobody tells you about maximizing your compact garden setup.
Vertical Training Secret: When training your green bean vines in Step 2, use soft plant clips instead of twine—they won't damage the delicate stems as the plants grow. I've found that bamboo stakes work best because they're sturdy yet flexible enough to adjust as vines thicken. Start training at the first true leaves (around day 7-10) when stems are strong enough to support gentle handling. This prevents the vines from snapping as they grow heavier.
Sprout Growth Hack: For your bean sprouts, maintain a consistent temperature between 65-75°F during germination. I keep my sprouting trays on the counter near a sunny window but away from direct heat sources. The 2-day mark for 1-inch sprouts is your sweet spot—harvesting earlier gives you more tender shoots, while waiting longer risks them becoming fibrous. Use a fine mist spray bottle instead of rinsing to keep the growing medium evenly moist without creating soggy conditions.
Harvest Timing Tip: The 2-3 day harvest window for green beans in Step 4 is crucial—pods grow fastest during warm weather. I set a reminder on my phone for every third day to check my plants. Look for pods that are straight and firm to the touch; if they start to curve or feel hollow when squeezed, they've passed their prime. For sprouts, harvest in the morning when they've had time to dry slightly after their final rinse—this helps them keep their crisp texture longer.
Season Extension Strategy: In cooler climates, use row covers during the day to capture sunlight and remove them at night to prevent overheating. I've successfully extended my growing season by 3-4 weeks using lightweight frost cloths. For sprouts, you can actually grow them year-round indoors with just a grow light—place the tray 6-12 inches below a fluorescent bulb for consistent growth without sunlight.
Pro Tips for Green Beans And Bean Sprouts
- Here's what nobody tells you about maximizing your compact garden setup.
- Vertical Training Secret: When training your green bean vines in Step 2, use soft plant clips instead of twine—they won't damage the delicate stems as the plants grow.
- Sprout Growth Hack: For your bean sprouts, maintain a consistent temperature between 65-75°F during germination.
Frequently asked questions
Got questions about growing green beans and bean sprouts? You’re not alone! Here are some of the most common queries—plus quick, actionable answers to help you grow like a pro.
Can I grow green beans and bean sprouts in the same container?
Not ideal! Green beans need deep soil (12+ inches) and sturdy support, while bean sprouts thrive in shallow trays with high humidity. Use separate containers: a tall vertical planter for beans and a wide, shallow tray for sprouts. For sprouts, a mesh or colander works perfectly—just rinse twice daily!
How long does it take for green beans to mature vs. bean sprouts?
Green beans take 50–60 days to harvest (from seed) if grown outdoors, or 4–6 weeks indoors with strong light. Bean sprouts? Just 3–7 days—they’re ready when roots are 1–2 inches long. Pro tip: Sprouts grow fastest in warmth (70–75°F) and darkness!
Why are my bean sprouts turning yellow or moldy?
Yellow sprouts = overwatering or poor airflow. Mold (fuzzy spots) = excess moisture or dirty trays. Fix it by:
- Rinsing sprouts 2x/day with fresh water.
- Using a clean mesh tray (sterilize with vinegar if reused).
- Draining well after rinsing—never let them sit in water.
What’s a good substitute if I can’t grow green beans?
Try these space-saving alternatives:
- Bush beans (compact, no trellis needed).
- Peas (vertical-friendly, edible pods).
- Radishes (fast-growing, 30 days to harvest).
- Microgreens (like broccoli or sunflower sprouts—ready in 1–2 weeks!).
Can I regrow green beans from store-bought seeds?
Yes! Save seeds from heirloom or organic green beans (avoid waxy varieties). Dry them thoroughly, then store in a cool, dark place for up to 2 years. Fun fact: Each pod holds 3–8 seeds—just scoop them out, rinse, and let dry on paper towels.
Wrapping up and next steps
From nutrient-packed green beans to crisp bean sprouts, growing these versatile plants is a rewarding way to maximize your compact garden’s potential! Whether you’re saving space with vertical trellises or enjoying fresh, homegrown sprouts in weeks, the key is consistency—watering, sunlight, and a little patience. 🌱
Ready to harvest the benefits? Start small—try a single vertical planter or a sprout jar today. Before you know it, you’ll be feasting on your own homegrown goodness and maybe even sharing tips with fellow gardeners! Happy growing!