
Tools
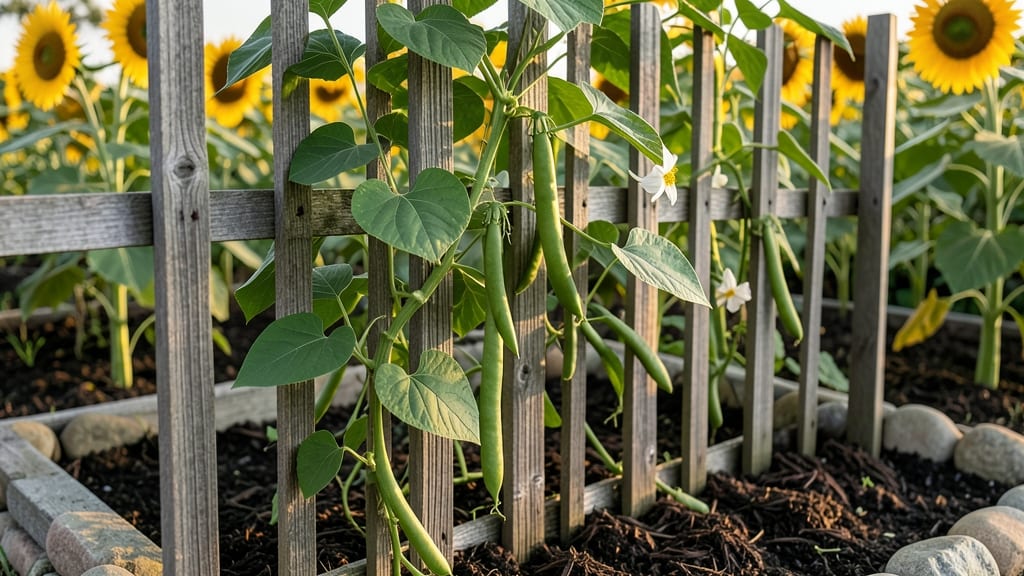
A trellis for pole green beans turns a chaotic corner of your garden into a neat, high-yielding vertical display—and saves you from fighting tangled vines. 🌱 I used to dread the mess of sprawling beans, but after installing a simple bamboo trellis last summer, my harvest doubled while keeping the garden tidy.
The key is choosing the right height and spacing to let those vines climb without crowding.
You’ll need just three supplies: a sturdy trellis (bamboo, metal, or wooden), 5-foot tall stakes for support, and twine or garden clips to secure the vines.
Pole beans thrive when given 4-6 feet of vertical space, and planting them 6 inches apart at the base ensures they don’t compete for sunlight. The best part? Trellising improves air circulation, reducing disease and making pods easier to pick.
Once your beans reach 6-8 inches tall, gently weave the tips through the trellis or tie them to the stakes with soft twine. Within weeks, you’ll see those lush, climbing vines transforming into a wall of edible greenery.
Harvest starts in 50-60 days, and the vertical growth keeps pests like slugs from feasting on your crop.
Pro tip: If you’re short on space, a freestanding A-frame trellis works great in small gardens, while a lean-to design against a fence maximizes yield. Just avoid overcrowding—pole beans need room to breathe, or you’ll end up with fewer, smaller pods. Ready to reclaim your garden’s vertical real estate?
📚 In This Guide
- What you need
- Instructions
- Tips and common mistakes
- Wrapping up and next steps
What you need
- ● Trellis Structure: 4–6 T-posts (5–6 ft tall, ½" diameter) – for vertical support
- ● 2–4 horizontal lattice panels (4 ft wide × 2 ft tall) – or DIY with 1×2 pine boards (spaced 2–3" apart)
- ● Galvanized wire (14–16 gauge, 100+ ft) – for securing panels to posts
- ● Fasteners & Hardware: Heavy-duty zip ties (50+ pieces) or staple gun + staples
- ● 4–6 lag screws (½" × 3") – for securing lattice to posts
- ● Tools: Drill/driver + drill bits (for pilot holes)
- ● Hammer or mallet (for driving T-posts)
- ● Measuring tape + level (to ensure straight alignment)
- ● Wire cutters (for trimming galvanized wire)
- ● PVC pipes (4–6 ft sections) – as an alternative to T-posts for a cleaner look
- ● Decorative lattice (bamboo, metal, or woven) – for a rustic or modern aesthetic
- ● Post caps or concrete footings – to anchor trellis in windy areas
- ● Drip irrigation kit – for hassle-free watering of climbing vines
Instructions for building a sturdy pole bean trellis
Here's my go-to method for creating a trellis that supports pole beans beautifully while saving space.
🪴 Step 1: Choose the Right Trellis Materials and Design
For a 4-foot-tall trellis, I recommend using 4-foot-long wooden stakes (2x2s work well) as the vertical supports. Drive two stakes 12 inches apart into the ground at each corner of your planting area, ensuring they're plumb (straight up and down). This creates a stable frame for your beans to climb.
For the horizontal crossbars, use 1/2-inch thick wooden dowels or bamboo stakes cut to 3 feet long. Space these 12 inches apart vertically along your stakes. This spacing gives beans plenty of room to weave through while keeping the structure lightweight. If you're working with a smaller space, you can reduce the height to 3 feet—just adjust the crossbar spacing proportionally.
🌱 Step 2: Secure Crossbars and Add Twine for Support
Attach the horizontal dowels or bamboo stakes to the vertical supports using soft garden twine or zip ties. I like to tie the crossbars at 6-inch intervals along the stakes to create a ladder-like structure. This design prevents the beans from getting tangled and encourages upward growth. Avoid using wire or anything sharp—it can damage the delicate stems.
Next, run twine vertically along the trellis, spacing it 6 inches apart between each crossbar. Tie the twine loosely to the crossbars so it sways slightly in the breeze—this mimics the natural climbing motion of pole beans. The twine gives the vines something to grip onto as they grow, preventing them from sprawling on the ground.
☀️ Step 3: Plant Beans and Train Vines Early
Plant your pole bean seeds 1 inch deep and 4 inches apart at the base of the trellis. Once seedlings emerge and reach 4-6 inches tall, gently guide the main stem up the trellis and tie it loosely with twine to the lowest crossbar. This encourages the plant to climb rather than sprawl. Avoid wrapping the twine too tightly—you want to support, not strangle, the stem.
As the vines grow, weave them through the twine and crossbars, letting them naturally attach. Pole beans have tendrils that cling to any surface, so minimal intervention is needed. If you notice vines getting tangled, gently separate them and guide them upward. The goal is to keep the plants vertical and well-aerated to prevent disease.
✂️ Step 4: Maintain and Prune for Maximum Yield
Throughout the growing season, check the trellis weekly for any vines that have slipped or become tangled. Gently retie or reposition them as needed. Prune any side shoots that grow below the lowest crossbar—these won’t produce pods and can shade the main stem. Focus on keeping the plant’s energy directed upward where it can bear fruit.
Harvest beans regularly to encourage continuous production. Pick pods when they’re 4-6 inches long and bright green—this prevents the plant from putting energy into over-maturing beans. A well-maintained trellis will support multiple rows of beans in a small footprint, making it perfect for balconies, small gardens, or even container growing.
Tips & tricks for perfect pole bean trellis construction
Building a trellis that actually works for pole beans takes more than just throwing together some sticks—here's what I've learned after years of trial and error.
Material Selection Matters: For the vertical stakes, I've found that 2x2 pressure-treated lumber lasts the longest in garden conditions. Avoid untreated wood that can rot within a season. For the crossbars, bamboo stakes are my top choice—they're lightweight, biodegradable, and provide just the right texture for bean tendrils to grip. If you're using wooden dowels, sand any rough edges to prevent damaging delicate stems. The ½-inch thickness specification isn't arbitrary—it's the sweet spot that provides support without being too bulky.
Precision in Spacing is Key: When attaching those 3-foot crossbars at 12-inch vertical intervals, use a tape measure to verify each spacing before tying. I've seen too many trellises where the spacing gradually gets wider—this creates weak points where vines can sag. For the vertical twine, the 6-inch spacing between crossbars is ideal because it gives beans enough purchase to climb without becoming overcrowded. Pro tip: Use a level when positioning your vertical stakes to ensure they're perfectly plumb—this prevents the entire structure from leaning.
Gentle Handling for Delicate Vines: In Step 3, when you're training those 4-6 inch seedlings up the trellis, resist the urge to tie them tightly. Use what I call the "thumb test"—you should be able to gently slide your thumb between the twine and the stem. Too-tight ties can girdle the plant and restrict growth. I also recommend using jute twine rather than plastic—it's more breathable and will break down naturally at the end of the season. This small detail makes a huge difference in plant health.
Season-Long Maintenance Strategy: The weekly checks mentioned in Step 4 are non-negotiable, but here's what I do differently: I mark my trellis with a small flag at the 4-6 inch harvest height so I can quickly see where to pick. This visual cue prevents me from harvesting too early (which stunts production) or too late (which makes pods tough). I also keep a small pair of pruning shears attached to the trellis with a carabiner—always having them handy makes maintenance effortless.
Pro Tips for Trellis For Pole Green Beans
- Building a trellis that actually works for pole beans takes more than just throwing together some sticks—here's what I've learned after years of trial and error.
- Material Selection Matters: For the vertical stakes, I've found that 2x2 pressure-treated lumber lasts the longest in garden conditions.
- Precision in Spacing is Key: When attaching those 3-foot crossbars at 12-inch vertical intervals, use a tape measure to verify each spacing before tying.
Frequently asked questions
Got questions about growing pole green beans with a trellis? You’re not alone!
Here are answers to the most common queries to help you grow like a pro.
What’s the best height for a trellis for pole green beans?
A 6- to 8-foot trellis is ideal—pole beans can climb way higher, but this height keeps them manageable and prevents overcrowding. Use sturdy materials like bamboo stakes, metal cages, or wooden frames to support their weight as they grow. For small spaces, even a 4-foot trellis works, but you’ll need to prune aggressively.
When should I plant pole beans near a trellis?
Plant seeds after the last frost when soil is at least 60°F (15°C). For most climates, this is late spring (April–May). Install the trellis before planting—driving stakes or assembling frames 2–3 weeks ahead gives roots time to anchor. Pro tip: If using a DIY trellis, build it after the soil warms to avoid disturbing early plantings.
Can I reuse a trellis from last year for pole beans?
Clean and disinfect wooden or metal trellises with a 10% bleach solution to kill pests/diseases. Plastic or bamboo trellises can often be reused without treatment unless moldy. Warning: If last year’s beans had blight or rust, replace the trellis or sterilize thoroughly to prevent reinfection.
What if my pole beans aren’t climbing the trellis?
Check these fixes:
- Thin vines: Overcrowded plants waste energy. Snip extra stems to focus growth upward.
- Check tendrils: Pole beans use curly tendrils to grip. If they’re dry or broken, gently guide vines onto the trellis with soft twine.
- Water deeply: Drought stress stunts climbing. Keep soil moist but not soggy.
- Add support: Wrap weak vines loosely around the trellis with biodegradable twine.
Are there alternatives to a traditional trellis for pole beans?
Yes! Try these space-saving hacks:
- Cattle panels: Bend 4-foot panels into arches or teepees for a sturdy, reusable frame.
- String trellis: Stretch strong twine between two posts in a zigzag pattern for a budget-friendly option.
- Hanging baskets: Suspend baskets near the trellis to grow beans vertically in containers.
- Fence or pergola: Train beans along an existing structure if it’s at least 5 feet tall.
Wrapping up and next steps
Growing pole green beans on a trellis isn’t just a space-saving hack—it’s a game-changer for small gardens and urban growers! 🌱 With the right materials and a little creativity, you’ll enjoy bountiful harvests, healthier plants, and easier maintenance.
Whether you’re a beginner or a seasoned gardener, this vertical approach makes growing beans fun and rewarding.
Ready to transform your garden? Grab your trellis supplies, follow the steps, and watch your beans climb to new heights! Start small, experiment, and enjoy the fresh, crisp flavors of homegrown pole beans this season. 🌟