
Plants
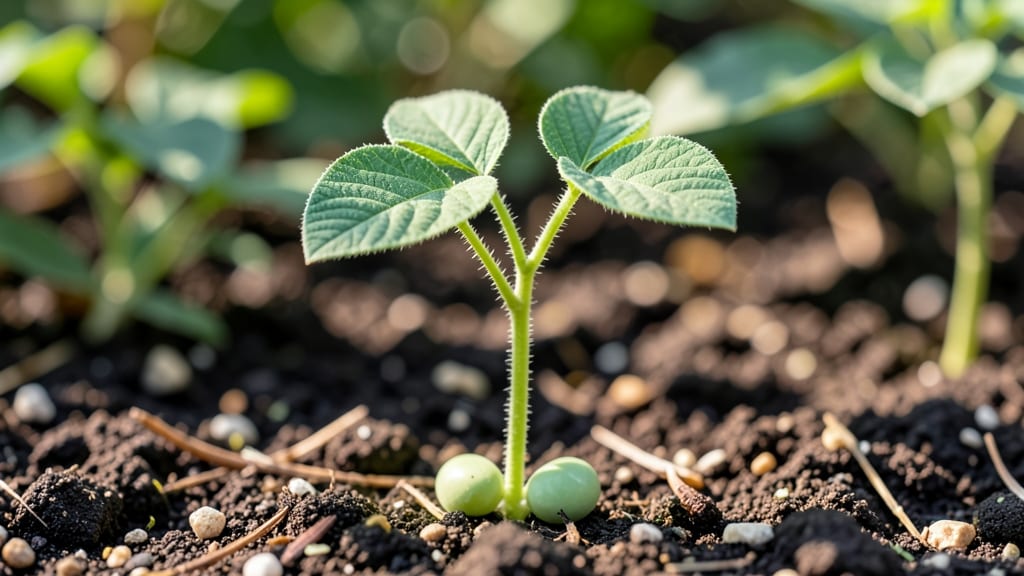
What do beans look like when they sprout—just a tiny white root called the radicle breaking through, your first sign that germination has begun, often just days after planting.
If you’ve ever wondered whether those tiny cracks in your soil are baby beans or weeds, you’re not alone—identifying bean sprouts early can make the difference between a thriving garden and a missed harvest.
Within a week, the sprout will push up a straight, slender stem called the hypocotyl, topped by two small, rounded leaves that look like tiny ferns unfolding. These early leaves are smooth and pale green, not the jagged edges of weeds.
Below, I’ll walk you through each stage—from that first root to the first true leaves—so you can spot your beans before they get crowded out by volunteers or confused with other seedlings.
Identifying bean sprouts: visual clues in the first 7-10 days
When you first plant bean seeds, the excitement of watching them sprout can be nerve-wracking—especially if you’re unsure what to look for. Bean sprouts emerge in distinct stages, each with unique visual markers that help you confirm they’re healthy and not weeds or mold.
Understanding these early clues ensures you don’t accidentally pull out your future harvest!
The first sign of life appears as the radicle, a tiny white root that pushes through the seed coat within 3-7 days after planting. This delicate root grows downward, anchoring the seedling while the rest of the sprout remains hidden.
If you see a small white thread-like structure in your soil, that’s your radicle—a good sign your seeds are germinating!
Next comes the hypocotyl, a straight, pale green stem that arches upward as it breaks through the soil. This stage typically occurs 5-10 days after planting and is one of the most recognizable features of a young bean sprout.
The hypocotyl often looks like a tiny hook or loop before straightening out—this is how it pulls the seed upward.
Here’s how common bean varieties compare in their early stages—notice the subtle differences in color and shape that can help you identify them:
The first true leaves of bean sprouts are another key identifier. Unlike the initial seed leaves (cotyledons), which are round and smooth, true leaves are compound and serrated, resembling tiny ferns.
For kidney beans, these leaves appear oval and dark green, while black beans develop narrower, three-lobed leaves. Pinto beans often have lighter green leaves that are rounder in shape.
One of the biggest mistakes gardeners make is confusing bean sprouts with weeds or fungal growth. Weeds often sprout faster with multiple thin stems, while mold appears as fuzzy or slimy patches.
If you see yellowing or brown spots on your soil, it’s likely mold—not a healthy sprout. Keep an eye out for these differences to avoid pulling out your future plants!
Light exposure plays a crucial role in how your bean sprouts develop. If your seedlings are growing leggy or pale, they’re likely not getting enough sunlight. Aim for 6-8 hours of direct light daily, especially during the first 2 weeks.
A south-facing window or a grow light can make all the difference in ensuring your sprouts grow strong and sturdy.
By day 10, healthy bean sprouts should have a pair of true leaves and a well-developed root system. If you’ve planted seeds in rows, you can gently thin them to give each sprout 3-4 inches of space.
This prevents overcrowding and ensures each plant gets the nutrients it needs to thrive. Use small scissors or your fingers to remove weaker sprouts at the base.
If your sprouts aren’t emerging within 10-14 days, check the soil temperature—beans prefer 60-85°F. Cold soil can slow germination, while overly wet soil may cause seeds to rot. Adjust your watering habits and consider using a seedling heat mat if your garden is too cool for optimal growth.
With these visual clues in mind, you’ll be able to confidently identify your bean sprouts and give them the best start possible.
Watching them grow from tiny radicles to lush seedlings is one of the most rewarding parts of gardening—so keep an eye on your soil and celebrate each new sprout as it appears! 🌱
Common mistakes that kill bean sprouts before they emerge
Even with the right bean varieties and planting depth, many gardeners struggle to see those first green shoots break through the soil. The problem? Common mistakes that seem minor can silently sabotage your seeds before they even get a chance to grow.
Let’s uncover the silent killers of bean sprouts and how to spot them early.
One of the biggest culprits is overwatering. Too much moisture suffocates seeds, causing them to rot before they sprout. On the flip side, underwatering leaves seeds dry and dormant, waiting for conditions that may never come.
Both issues can leave you staring at empty soil, wondering where your bush beans or pole beans went wrong.
Then there’s the soil temperature. Beans need warmth—ideally between 60°F and 85°F—to germinate. If your soil is too cold, seeds may simply refuse to sprout, leaving you confused about whether they’re alive or dead.
Even poor seed placement, like burying them too deep or too shallow, can prevent germination entirely.
- Rotting seeds: Dark, mushy soil around seeds (overwatering or fungal issues).
- Dormant seeds: Dry, shriveled seeds with no signs of cracking (underwatering or cold soil).
- No sprouts: Empty seed pockets with no radicle or hypocotyl (incorrect depth or old seeds).
🌱 Pro Tip: If seeds don’t sprout within 10-14 days, they’re likely dead—replant!
Diagnosing these issues early can save your garden. For example, if your seeds are rotting, you’ll see a foul smell and slimy soil. If they’re just dormant, the soil might feel cool to the touch.
Meanwhile, seeds planted too shallow may dry out before sprouting, while those buried too deep struggle to reach the surface.
Fixing these mistakes is easier than you think. Start by ensuring your soil temperature is ideal—use a seedling heat mat if needed. Water only when the top inch of soil is dry, and plant seeds at the correct depth (usually 1 inch deep for most beans).
These small adjustments can mean the difference between a failed batch and a bountiful harvest.
Don’t let these common mistakes turn your garden into a graveyard for seeds. With the right care, your bean plants will soon be reaching for the sky, ready to produce pods in just a few short weeks. 🌱